Showing posts with label cabinet refacing. Show all posts

Friday, October 21, 2011

Face Lift!!

Nothing like a cabinet reface and granite delivery to brighten our day -- and house. We are so happy with how everything is coming together and highly recommend Affordable Refacing for cabinet refacing and Stone One in Methuen for granite and tile. Tiasha from Stone One has been great to work with, and the granite selection is phenomenal...as you can see for yourself! The granite for the kitchen island will arrive once the island is installed...which is the same time the granite (we actually went quartz) for the master bath will be delivered.
Here's a view from the dining room. New floors arrive in the next week or two and once the plastering/skim coating is finished, this will look so much better. Affordable Refacing is coming back in a couple weeks to build the cabinet above the fridge. It will be a 36-inch wide cabinet (same width as our fridge), which we barely have room for, but Black Tie Property is going to add some wood "padding" and trim to make sure the fridge and cabinet aren't hanging into our hallway.

Here is a view from the breezeway/den doorway. They will also be coming back to finish the cabinets above the microwave they had to shorten/build. There actually was no microwave in the old Phelps' kitchen so we opted for a microwave/venting hood combo. Distance between microwave and stove should be 18 inches, hence the shortening of the cabinets:

This is the bank of drawers to the right of where the stove will be. Love the polished nickel Gilmore pulls from Restoration Hardware:

We actually thought we wouldn't like the backsplash we originally purchased and, instead, were considering opting for something more colorful with blues, greens, etc. Once everything was installed, the original backsplash looked quite good in our opinion. Since the granite is more grey than we rememebered (not complaining, just observing), it serves as a nice contrast and still offers the "marble look" we really like. The blue/green backsplash option that we THOUGHT we would like more really didn't go at all. Just goes to show - trust your gut!


And only because we promised...

And on the topic of action photos, here's Stone One installing the granite.
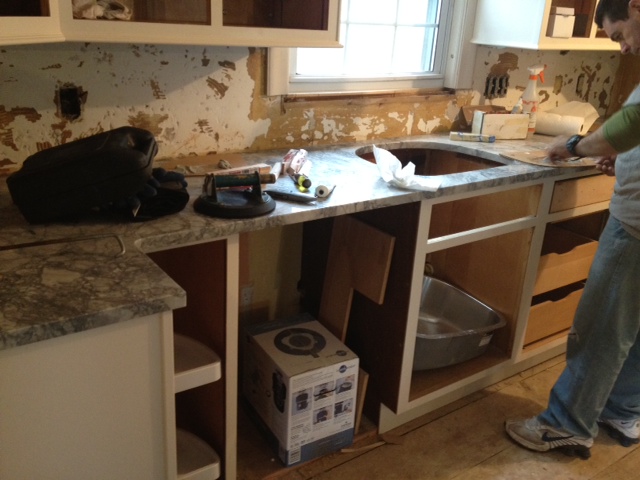
They mixed up a "glue" of some sort that matched the grey in the granite perfectly. The seams are truly not noticeable. As fun as yesterday was, it was still rather stressful because I had to make a lot of random decisions. How'd I do?
1. Do you want faucet and soap dispenser on right or left? (I chose right for faucet, left for soap dispenser?)
2. Do you want a pull on the "fake drawer" below the sink (I said no because it isn't a tilt or anything and it might be confusing to people who don't know that.)
3. Which way do you want the cabinets to open? (This seems obvious but, when you're in our kitchen, you'll see that we didn't do what's most common these days for the two cabinets to the left and right of sink. We chose to do what the Phelps' did and have two left cabinets and two right cabinets, rather than two sets of right/left. Hard to explain...
There were other questions but the level of minutia is not worth getting into. Those were the ones that I had to "phone a friend" (i.e., my husband) for input. He, of course, chose left side for faucet, yes for pull under the sink and "center open" for the cabinets...but soon came around. It's all give and take. And he's getting his carpeted bedrooms.

Wednesday, October 19, 2011

Full House and Halloween Costume Inspiration

Lots going on at Salt Wall today. Literally, the street was packed with trucks and cars when I showed up this morning. We've got several different contrators coming and going this week. Here’s what work is in process:

Affordable Refacing showed up at 8am and got straight to work on removing our cabinet doors, refiguring the cabinets themselves and – eventually – the moment we’ve all been waiting for – they will spend the next 48 hours giving our dark and dreary (but high quality!) cabinets a brand new look. It’s a two-day process and will really look complete after tomorrow when the granite is installed. We timed the installation of the granite so that it will sit perfectly on the cabinets – no shims will be required, no gaps between wood and granite. These guys are great. They’re even going to install the shiny polished nickel knobs and pulls (from Restoration Hardware – I splurged).


Affordable Refacing also plans to layer a piece of linoleum that Chris bought at Home Depot below the sink cabinet to prevent future damage to the wood from drips and leaks. This was Shawn from Affordable Refacing’s idea – and we thought it was brilliant. A good DIY project for people who want to protect new or refinished cabinets - or even to patch up some rotting wood or damage from leaks!

The electricians are also at Salt Wall today installing the recessed lights. With the days getting shorter, it will be so nice to be able to walk around the house with Chris when he gets home from work to check out the progress – without it being so dark. Before that can happen, we’ll need switches, though…which comes after the skim coating. But still – it looks more complete with the recessed lights in!
On the topic of skim coating… In just a few days we will have white walls! Right now, we have blueboard or drywall. Already, the house looks more like a house with real rooms rather than rooms that are framed out with just wood. Now we don’t have to use our imagination as much when we say things like, “This will be our bedroom” and “here is our guest bath.” The photos below don’t properly convey how awesome it feels to have walls up – mostly due to the lack of light. The effect when you’re inside the home is pretty dramatic: Everything feels “closed up” (but not in a small/claustrophobic way), and no longer can I see the guest room through the master bathroom’s closets.


For those not in the know, skim coating is the process of applying a layer of muddy compound to smooth out rough or damaged ceilings and walls - which will happen on the first floor because we've had to patch up a skylight in the ceiling, holes from electrical, plumbing, HVAC and demolition work (e.g., chimney and wall removal) - or to cover up seams in and smooth over new blueboard (which will be what it is used for in the upstairs).

After applying a slab of skim coat, the excess is skimmed off and a second layer is often added. The wall can then be painted or wallpapered without the appearance of dings, paint bubbles, or roughness. Which means it really is time to think about paint color! Of course, the floors will need to be done (tile in bathroom, hardwood downstairs and upstairs hallway, carpet in bedrooms) before we can actually paint…but I’m ready to make decisions on color – with your help, of course. But we’ll save that topic for another blog posting. As an aside, Chris has put a moratorium on me actually talking about paint and breaking out paint samples at home, so the blog is my only outlet on that topic.

Btw, our neighbor (er, my parents’ neighbor) Dave Boucher is doing the drywall and skim coating. We’re hoping to catch a photo of Dave in his stilts during the project. For now, I will leave you with this photo of not-Dave. I may have just found inspiration for a Halloween costume.

Monday, October 17, 2011

Manscaping and Magic Keys

Hello friends! It’s been a while since I had the chance to put down a few words on the blog and I will do anything to have my shirtless cupola photo moved from the home page.


The last 10 days at Salt Wall Lane have been very productive indeed. All the insulation is in and the interior is actually rather quiet. But last weekend we had some real noise. We had some folks Kel found on craigslist.com come up from Sudbury and in exchange for the dirty job of removing our 250 gallon oil tank, they got to siphon our 60 gallons. It was a filthy job and ended up taking them near 4 hours from the time they arrived (1.5 hrs. late) until the time they packed up their hoses and trailer and bounded off into the night. They left quite a mess and the house smelled of heating oil for a few days, but it was a relief to get that thing out of there. I am pretty excited to have two separate units in the house all gas and electric powered. We have a unit in the attic that handles the upstairs climate and another in the basement which handles the first level. The cost of having a much more comfortable house should be worth it, yet still save us some money in the long run.

Other progress that I didn’t participate much in, was the removal of the breezeway/mudroom/den door to the house. It has been opened up and will be a nice walkway into the kitchen with hopefully a lovely rounded set of wooden stairs. We also pulled off some more knotty pine paneling in the den and plan to add drywall in its place. So 3 of the 4 walls of this room will be drywall, leaving one accent wall with the pine paneling. No longer having the remote controlled side entry door from the breezeway to kitchen, we needed to replace the knobs and locks on the two front facing entry doors. Kel handled cutting the holes and installing the lever and deadbolt in the new breezeway door and I installed the new front door knob and deadbolt. We reconvened after both doors were functioning as intended and Kel brought to my attention that we had bought three locks with differing key codes. So it was back to Lowes to find three of the same locks with the same 6-digit tumbler codes. But not so fast I discovered…


Schlage locks had a pretty cool built-in technology. These days each lock or lever come with three keys. Two that match the lock and a third blue key. These blue keys serve as a master for that specific lock and allow owners to reset the tumblers inside the locks to sync all other doors that have blue keys to one set. I know it seems confusing and I was sure to ask the old guy at the home improvement store the question I have learned to be most valuable when doing these projects, “What can I do that will screw this up?” But here is the deal: you pick the lock you want to serve as your main key (in our case, the breezeway deadbolt) so I took the breezeway lever’s blue key, put it in the lever knob and turned it a quarter turn to the left and pulled it out. Then I took the breezeway deadbolt’s blue key and inserted it into the breezeway lever and turned it back to 12 o’clock and now the lever and the deadbolt were in sync with one key, the breezeway deadbolt. I followed this same trick with the front door and by inserting the front door’s blue key and turning it slightly to 10 o’clock, pulling it out and inserting breezeway’s blue key and turning back to 12 o’clock, the front door was synced to the breezeway deadbolt.


Tip: Only way to screw this up and lock up your tumblers and have a worthless lock is two not insert TWO blue keys back to back. People have been inserting blue key from Lock A and then immediately inserting regular key from Lock B and ruining the whole setup. So remember kids, always follow the first blue key with a second blue key. It’s that easy!

Oh, on another note, the exterior shutters arrived and Kel installed them on the siding. They were flat front black Builder’s Edge shutters from Home Depot. They look great on the front and side of the house. We plan to paint two main entry doors black to match and should be a nice contrast to the white accents and the slate blue siding. We also have moved the 20 year old, fully functioning refrigerator to the basement. Time to fill it up with a variety of ice cold libations.

Getting back to work…

Something that has been bothering me since the day we closed was the overgrown backyard and the odd vine trellis thing. I envision one day soon (next 6 months) having removed all of the chain link fencing and replacing with a 6-foot wooden privacy fence. Until I can save up for those materials and wait for the ground to defrost, I will slowly rip away all overgrown-ness and find a way to dispose of it (still considering trading in my Altima for a pickup of some sort, but that is a different discussion).


This Sunday I spent the morning leading up to the Rex Grossman Interception Clinic, sawing, digging, prying and all out attacking this vine fence. I finally won and it appears my backyard has doubled in size. Next weekend I take on the garden from hell. It has not been tended to for almost 10 years, so who knows what I will find. Hopefully it’s too cold for any brown recluses or any cottonmouths.

The sheet rock, cabinet re-facing and granite install happens this week, so the house and rooms should really start to resemble a normal living space. We. Are. Stoked.

Wednesday, September 14, 2011

Polling the Audience: White or Antique White Cabinets?

It has been awhile since we've posted. Our lack of commentary is in no way indicative of lack of progress. Quite the contrary, in fact! It's more that we've been blown away by progress to the point that we don't know what to focus our posts on and, more accurately, we've been (read: I've been) paralyzed by indecision to the point where I can't decide if I even want to get others to weigh in or not. It's a sickness, really.

The decision that has caused me the most angst thus far has been cabinet color (master bathroom layout and lighting fixtures/placement are a close second). As you know we are getting our cabinets refaced by an awesome company called Affordable Refacing. (God love Shawn, the owner, for putting up with me.) We are to decide between white and antique white. First, we chose white because I love the look of the all-white cararra marble kitchens. Very clean, very chic, very en vogue. But then we chose antique white because I feared the white would be to stark/sterile. But is the antique white too creamy? I flip flop daily and thought that I'd use a lifeline and poll the audience.

Below is a photo of the two color options. We're going with the door style on the left no matter what.


As a reminder, here's our backsplash and granite.


Because I am a big loser, I took the liberty of creating a PowerPoint slide that puts all of the pieces together. Here's a screenshot of it. The two cabinets on the left are antique white and the two on the right are white white.


So which color?

Shawn is so awesome that he actually told me he could custom spray each of the cabinets ANY Sherwin Williams white that I liked, but, before I put him and his guys through that, I want to make sure I can't live with one of these choices. (Because if I go with that option, you do realize there are about 100 Sherwin William whites!)

I'm not cut out for this...

Suggestions welcome :)